
So you made a few pens but what or how to finish wood pens? Pen finishing techniques will be what sets your pen apart from the rest, the art of polishing wooden pens. If the pen is for yourself or your family the pen finishing techniques, you use won’t be so much of a problem. You can reapply the finish for friends or family when needed.
Selling pens for money either online or at craft fairs needs a better finishing technique. Customers at craft fairs are most often looking for handmade gift ideas. How many are interested in making wooden pens? What they will know about is a poor quality finish.
With a large selection of pens for sale at events and in our online pen shop, I don’t want customers returning stuff or complaining. Good work has people coming back again and again.
Wax Finish
Finishes such as wax will offer no long-term protection when finishing wood pens. Wax is a soft finish and no good on furniture or turned work, constant reapplication and maintenance required. If used as a finish on pens, the heat from the hand will soon have it melt and wear, never mind on a hot summer’s day. Oils from the skin will soon break it down and leave gummy.
Oil Finish
Oil finishes either on their own or used in combination with wax offers the same protection as above. There is wiping varnish used a lot on pens in the USA, this is not available in the UK. This may offer protection on the wood because the varnish will cross-link with itself as you build it up. Wiping varnish will still take time to apply and build up. If you want to make your own, I found this recipe.
Friction Polish
Friction polish for pens as above still no good even in some modern concoctions. They saw French polishing as the ultimate finish, but only because of the finishes available. Pens in daily use will have a hard life the wear caused by friction and things spilt on them at the office desk. I’m sure as a woodworker you have read articles about white rings on furniture or even asked to repair them. So friction polish is no good for a wooden pen.
Melamine Laqueur
Melamine lacquer is an alternative wooden pen finish. Most finishes give off fumes this one included. I have tried this, but it takes time to apply and then left a week to harden. Hardening over a week is fine for bowls but I can’t be doing with it on a pen made of wood.
Super Glue Pen Finish
A super glue pen finish is tough and durable, easy to apply with good results. Super glue wood adhesive is readily available from tool shops or online. The only downside the fumes sometimes given off. Most of the time, I notice no fumes, working with good ventilation or with a fan blowing across the bed ways in winter.
Best CA Glue For Pen Finishing
I use none of the propriety glues from the pen suppliers. With the medium or thick glues, I use just the one brand because that’s what the tool shop has. Possibly slight differences between the thin glues mine whatever I can find on eBay in bulk. All the thin glues are so thin just like water and never had a problem. Don’t bother with the small little tubes from the pound shop that’s a waste of time.
CA Pen Finishing Techniques
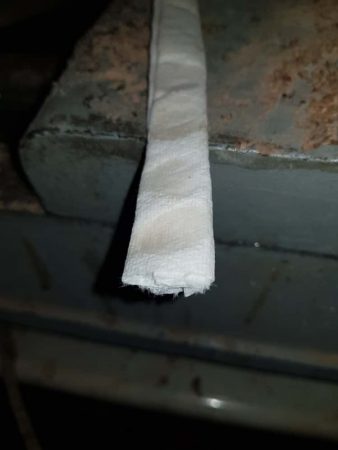
First sand to 400 grit removing any marks/scratches. For, Ca glue application I use whatever kitchen roll the wife buys. Depending on brand and quality, you may be able to cut a sheet in half. Fold the sheet/half sheet into itself until about a finger’s width. Some people use the plastic bag that the pen kit comes in as an alternative to the kitchen roll.
With the towel under the wooden pen pour on two thin coats of Ca glue as the lathe spins, let dry between coats. Once dry apply a couple spots of medium CA to the towel and apply to the bottom of the blanks. Always keep the towel moving with two wipes per spot, do this eight times. Some people use an activator between coats but if you’re not careful, this can cause frosting that needs cutting back.
Too much glue applied to the kitchen towel causes it to smoke, there is a reaction between the two. Remember to work with good ventilation as with any finish.
Polishing A Wooden Pen
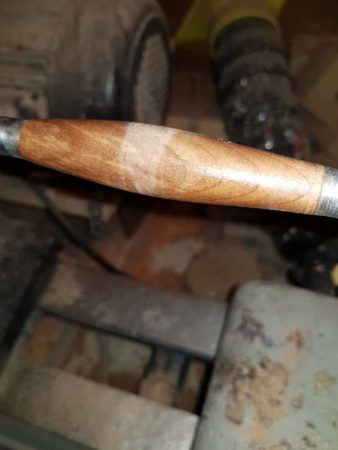
Once the glue has dried polishing, the wooden pen can begin. Any moisture in contact with the finish before fully dry will cause frosting. If any frosting is present, it’s best to go back to 240 or maybe 320 grit, then reapply a couple more coats of cyanoacrylate finish. Once everything Ok it’s just, then a matter of working through the grits of micro mesh for the stunning gloss finish. With two pens made, and you get used to the pen finishing technique application is fast and easy.
Boiled Linseed Oil And CA Glue Finish
Using BLO or boiled linseed oil and CA glue was first used when the CA finish was new and is an unnecessary step. This was first thought to give better adhesion with the glue and wood (there is another chemical reaction between the two). Using BLO may help to colour the wood a little but super glue does this itself on some woods, more on this further on. The only time I use this BLO and CA glue finish is with an oily wood. Some pens such as a Lignum Vitae pen might have adhesion problems with the wood to be on the safe side I use it.
Pens With Dark Wood
A wooden pen made with dark wood and a super glue finish can turn the pen jet black. This is undesirable, as the wood grain can’t be seen and looks like black plastic. Through trial and error, it seems down to grain orientation and how many coatings are applied. I couldn’t figure out how much the grain direction has to be off to affect it or if it was a different reaction between each blank. So I have stopped making pens with Black palm and Bog Oak. African Blackwood doesn’t seem affected. For Wenge, a solution with treating the wood or I won’t use this one either.
CA On Other Small Projects
The cyanoacrylate finish doesn’t have to be only a wooden pen finish; with practice someone can use it on other small projects. Cap’n Eddie Castelin uses it as a finish with a spray gun.
Summing up the Ca finish is an advanced pen turning technique that has a superior quality for the best pens and other wooden items. Do you have any finishing tips or techniques you would like to share? If so, please leave comments below.
Related Reading
Craft Quotes: Inspiring for Woodworking Artisans And Enthusiasts
Woodworking requires many tools, but the most important tool of them all is the one you have in between your ears. Successful woodworking is mainly dependent on your ability to plan out a project, determine the tools and materials you…

Take This Quiz To Test What You Know About Woodworking
Woodcraft has been practised for thousands of millennia, newfangled tools and machinery come and go. The essential principles however have not. You can look at the work of a craftsman…

Stainless Steel Rings Pros And Cons
Stainless steel as a wedding ring has plenty to recommend it-affordable and retains its lustre and gleam for years. The pros and cons of stainless steel rings are in the…
"I like to make things. I'm not a super handyman or anything, but I've always been interested in woodworking and other DIY projects. I find that if I have something in my hands, I can solve difficult problems better than if I am staring at a computer screen or reading about them on the internet." There is only so much furniture and art you can fit in a house, and giving to family and friends only lasts so long, so here we are with a crafts shop.
I enjoy writing about my projects and other topics related to crafting, like making something with your hands.

Well done for beginners.
My ca finish sticks to the bushings and cracks at the ends when removed from the mandrel. Any suggestions?
Make sure you keep the bushings clean with acetone. A sharp tap on the bedways works for me but you can make your own tapered HDPE bushings. Swap for the HDPE just to apply and polish the CA.
I try and try again but when I try a finish with CA it just turns out horrible. I end up having to sand all down and start over. Did that three times tonight so gave it up again. When I try thin CA, it doesn’t work, when trying with medium ca, it’s too thick and splotchy. Which CA’s work over others? Which are more of a sure thing, I’m sure you have used multiple brands.
Thanks for the question John, so many struggle and give up with learning the technique. Till you get the hang of it just stick with medium CA and don’t worry about brands. Place a spot on folded kitchen and wipe backwards and forwards till it starts to grab for each barrel, then walk off and leave the lathe running for a couple of minutes and do a different job. Before applying anymore run the back of your finger along the spinning barrel, you shouldn’t feel any tackiness. Rinse and repeat.
If it is messy that happens because not all coats are dry when you start wet sanding. Coats could be too thick or not going off in a cold unheated workshop, I have a small fan heater blowing near the headstock.
Good advice. In Australia we do have good friction polish called Aussie oil, I have done hundreds of pens and find it quite acceptable. 4 to 6 coats. Also a good thin ca glue I use is called Mily Lime. The only issue I have is called impatient 🤣. Very important to use plastic spacers and not your metal spacers or bushings. I forgot yesterday and it took me 2 hours to get the blank off my mandrel.